
Make your own Quilt Block Star Sweatshirt

If I were one of those really organized, plan-ahead type women, I probably would have purchased some cute sweater to wear on Christmas day.
But I’m not.
And I think it worked to my advantage!
Somewhere in the midst of all the baking, picking up the house, and finishing wrapping presents on Christmas Eve, I decided what I really NEEDED was a Christmas sweatshirt, knowing that I had a plain red one in my closet that I never wear.
In my fabric stash I knew I had some Christmas fabric from a project a few years ago, and after playing around a bit, sewing, ripping out seams, re-sewing, . . . and ripping out more seams, I finally figured out how to get the star portion of a quilt block onto my sweatshirt.
And I LOVE it.
So much that I wore it for 3 days straight. I mean really — I had to. Obviously I had to wear it the day after Christmas, and then when my parents came into town I had to wear it for that Christmas gathering as well. And then my Mom and I both decided we needed non-Christmas versions to wear in January and February. It all makes sense.
Since I’m making more, I thought I’d share how to make your own.
SUPPLIES:
Sweatshirt
Scrap fabric — pieces should be about 5”x 5” to make it easy on you
Sewing machine
Coordinating Thread
Water Soluble Pen or Chalk:
Madam Sew Chalk Fabric Marker for Sewing and Quilting
DMC Embroidery Transfer PenSome sort of Double Stick Fusible Web — I’ve used both of these:
Pellon EZ Steam II Lite 12x9 sheets
Pellon EZ Steam II Lite 1/2” Tape
I got my sweatshirt at Target, dug around in my fabric and scraps and started playing with color combos and placement. I like lots of color and scrappy, so I wanted 2 different fabrics for my star points on this one, but you could select just one like I did for my Christmas version. I decided on an older Anna Maria Horner fabric for one of my pinks, but discovered I didn’t have enough scraps, so I ended up with 3 fabrics for my star points instead of just 2. I’m not at all disappointed. :)


In the beginning, my plan was just to make a star and sew it onto the sweatshirt, but quickly discovered that I ended up with some funky seams that didn’t line up right and it wasn’t as straight-forwarded as I assumed. The trick was to go ahead and make a full 9-patch star block, then trim it down, leaving an outline of the background fabric. Of course, you could use one of your star point fabrics and make it all blend together, but I opted for mostly white fabrics for all the ones I’ve done so far.
CUT LIST:
5”x5” Squares
(x8) Background
(x1) Square-in-a-Square Background
*Star Points can be larger than 5x5*
(x2) Star Point 1
(x2) Start Point 23”x3” Squares
(x4) Square-in-a-Square Corners

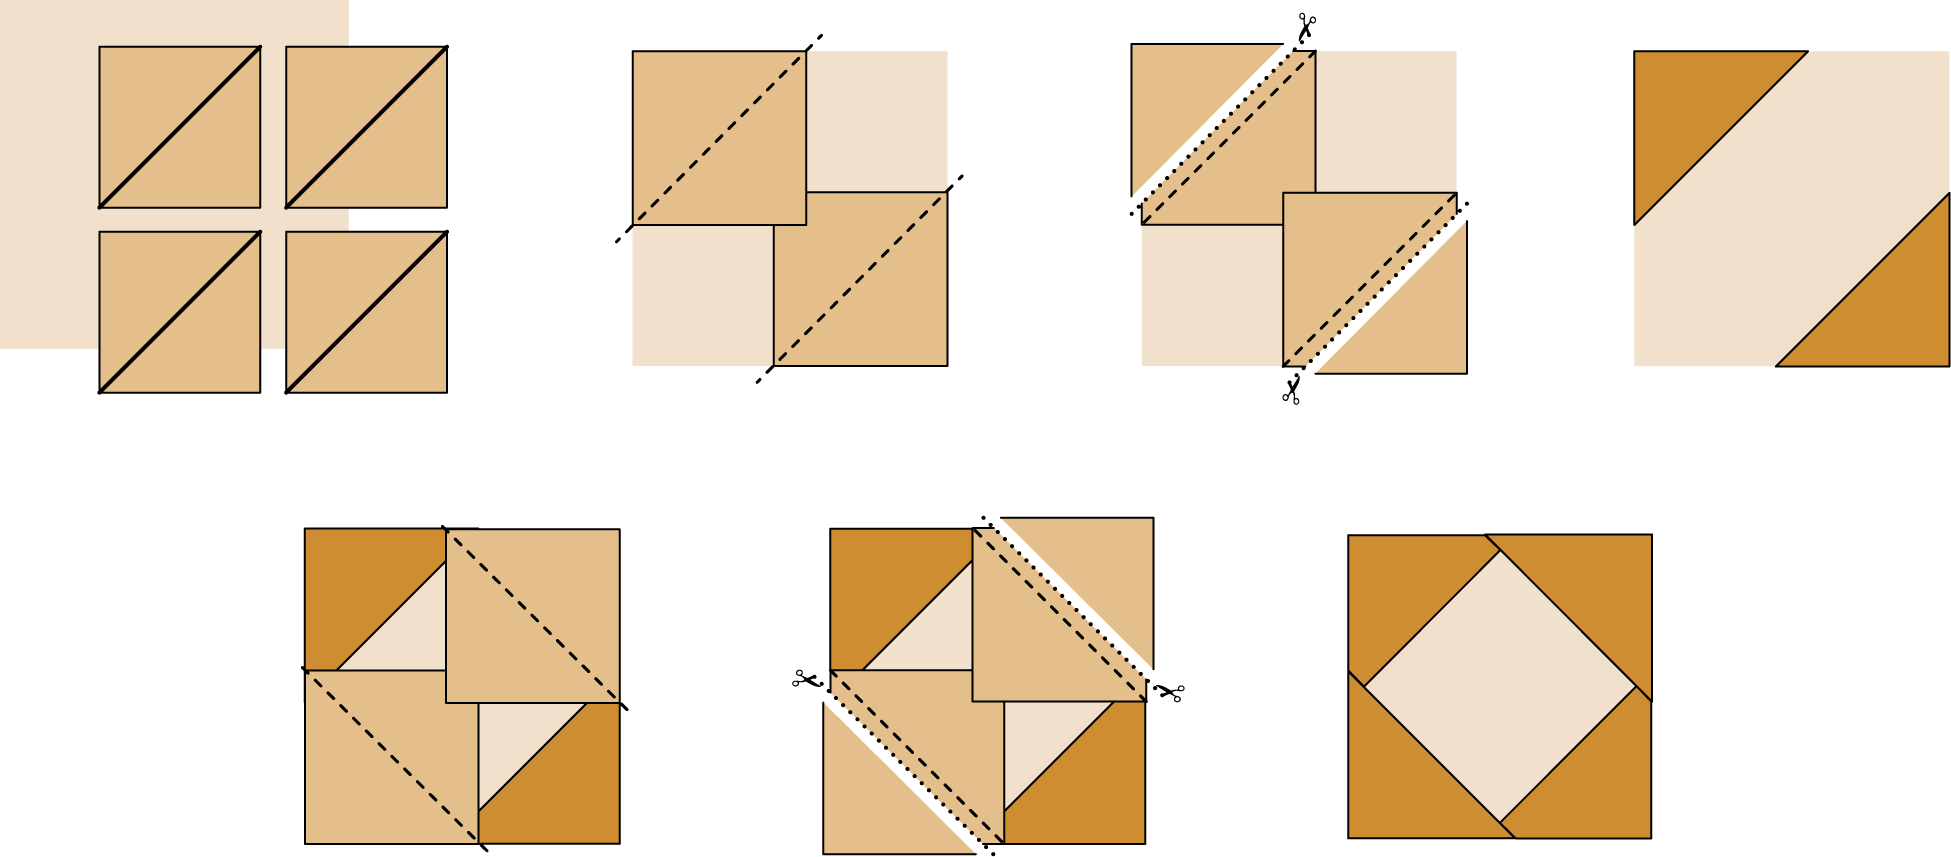
SQUARE-IN-A-SQUARE BLOCK:
On the wrong side of all your 3x3 squares, draw a diagonal line with a ruler from corner to corner.
Align and pin 2 of the 3x3 squares to opposite corners of your 5x5 background fabric for the Square-in-a-Square block with right sides together. Stitch directly on top of your line for each of the squares.
Cut away the background fabric 1/4” from the line you just stitched. Fold triangle down and press seam allowance open.
Repeat steps 2 and 3 for the other corners.
WONKY STAR POINTS:
With a rotary cutter and straight edge, cut all your star point fabric in half from diagonal corner to corner. You will now have (4) triangles of each color.
Gather (4) of your 5x5 background squares and (4) of your star point triangles. Place one of the triangles on each of your background squares. The triangle can be placed at various angles, but make sure that when you fold it back it will cover the entire corner once it’s sewn. You can make these as wonky. . . or not so wonky. . . as you want!
Sew the triangles with a 1/4” seam allowance.
Trim away excess background fabric 1/4” away from seam. Fold triangle down and press seam allowance open.
Repeat steps 2–4 with the remaining (4) triangles, overlapping the first star point fabric.
Trim blocks to 5”x5”.

ASSEMBLE THE BLOCK:
With a 1/4” seam allowance, stitch the rows together as shown. Press top and bottom row seam allowances in toward the star point blocks, and press the center row seam allowances out toward the star point blocks.
Stitch the rows together using a 1/4” seam allowance — the seams should nest if pressed in the correct directions. Press seams in toward center.

TRIM OUT STAR:
With a clear quilting ruler and a water soluble pen or chalk, outline the star 1/2” from its edges.
Carefully cut out your star with scissors, following your marked line.

ADHERE TO SWEATSHIRT:
If you use sheets of fusible webbing, you will outline the star on a full sheet of webbing and cut it out (cut inside your line so the edges don’t stick out), then sandwich it between the star and the sweatshirt instead of following these instructions.
Place sweatshirt on an ironing board, or with a wool pressing mat on your table.
Position the star on the sweatshirt where you’d like it to go.
With the water soluble marker or chalk, mark the outline on the sweatshirt.
Flip sections of the star up and line the areas with the fusible tape, fold them back down, and repeat on all sections until it is set to be fully secured.
**Do not iron directly on your cutting mat — I’ve may have learned the hard way! :)
Follow the instructions on the fusible webbing to iron the star to the sweatshirt.Decide how close to the edges you want to sew and stitch the entire star shape to your sweatshirt, then move the the interior and continue stitching. This will ensure that the fabric star doesn’t pull away, and will give the star a crinkly-quilt look once washed.


Ta–Dah!! Wash it. . . or just wear it if you’re anywhere near as impatient as me!
Be ready to accept all sorts of compliments and get to say “Thanks! I made it” over and over again.
You’ve been warned. :)
Be sure to tag me on Instagram if you make your own — I’d love to see what you make!
